Sunday, November 8, 2015

Ralphie in Pink Bunny Suit


Ralphie pattern for sale on Ravelry.com

Hello hello hello...trying to get back into the swing of blogging again! I was able to get my latest design onto Ravelry tonight and wanted to share it here.  If you are looking to create your very own amigurumi Ralphie doll from A Christmas Story, here you go! :D Enjoy, happy crocheting :D

Thursday, August 7, 2014


It's about time I start keeping up on here better.  Having a working computer and all, there's hardly any excuse not to! :) 

Have been making things almost daily, so I will have lots to post of projects from the recent-past.  This particular one above is a custom rug I'd made for a nice lady who wanted it for her teen daughter.  She is a Walking Dead fan (can't blame her!) and wanted a rug that had to do with that theme.  This was prior to adding a target symbol above and "blood" splatters all over the whole thing (done with a mix of acrylic paint colors in red/brown).  

I've got 99% of my finished projects on my Instagram (BelleAndrew if you'd like to come see or follow along) and you'll probably see them pop up on here soon, too, so I can catch up on posting. 

Tuesday, April 23, 2013

Plushie Owl (with pattern!) Crocheted

Wow- long time, no update... we've had lots (and lots) going on in this household and to be honest, just haven't had time or ability to update on here.  The only way I have to update my blog at the moment is using a dinosaur of a laptop and it's on its last leg.  So I will do the best I can and in the meantime, attempt to figure out how to blog using the tablet!

I've been regularly posting to my Instagram account (I'd love for you to follow me there: BelleAndrew) and you will see the owl for this pattern there from roughly 2 weeks ago. :)


PLUSHIE OWL PATTERN:
You will need worsted weight yarn in 2 colors (which you will hold and crochet with simultaneously) for the body and wings, and any colors of your choice for the eyes, beak and tummy (only 1 strand at a time).
Crochet hook size "I"

You will work in rounds after the initial chain. Use stitch markers to help mark the end of each round.

With 2 strands held tog, chain 8.
1. sc in 2nd ch from hk and ea ch after to last.  3 sc in last. Working around to other side of ch, sc next 5.  2 sc in final ch.  do not sl st. (16)
2. *2 sc in next st, 1 sc in next* around (24)
3. *2 sc in next st,  1 sc in next 2* around (32)
4-17. sc around (32)
18. 2 sc in next, 2 sc, 2 sc in next, 10 sc, 2 sc in next, 2 sc, 2 sc in next, 10 sc
19. 3 sc, sl st into next. turn. 2 sc, sl into 3rd.  F.O.

with finished ear on the right, count over 10 spaces and join in 11th to begin other ear.
Repeat 19 but don't F.O.

For eyebrow/peak:
*Continue into next space from the skipped 10 on top of head. sl st into 1st.  sc into next 8 (front loop only) sl st into last, turn.
*skip very 1st st, 6 sc, sl st 1, turn.
*skip very 1st, 4 sc, sl st 1, turn.
*skip very 1st, 2 sc, sl st 1, turn.
*ch 1, sc2tog., ch 1.
*carefully sl st around entire top edge of head/ears.  when you reach the point again, F.O. weave in all ends and stuff.  Squeeze top of head together and stitch closed- be sure to use the back loops only of the portion you crocheted FLO.  Leave the eyebrow/peak UNsewn until after adding the eyes.

For eyes (make 2):
using center yarn color, ch 2.
*6 sc into 2nd ch from hk.
*2 sc into each sc (12). switch to outer color
*(2sc ,  1 sc) around (18)
*(2sc, 2 sc) around (24)
sl st into 1st st. F.O. leaving long tail for sewing. Attach to head

For beak:
with beak color, ch 5
*sc into 2nd ch from hk. sc 2, sc2tog turn.
*ch 1, sc , sc2tog, turn
*sc2gtog, ch 1. f.o. leaving tail for sewing. attach below eyes

Sew down the eyebrow/peak.

For wings (make 2):\
Holding 2 strands tog: (leave long tail at beginning for attaching later)
1. ch 2, 4 sc into 2nd ch.
2. ch 1, turn. 2 sc into 1st, sc 2, (2 sc into last).
3-5. ch 1, turn. sc across (6)\
6. ch 3, turn. sl st into 1st st. sl st into next, ch 3, sl st into next, sl st into next, ch 3, sl st into next, ch 5, sl st into next. F.O. weave ends.   Attach to body.

Sew or glue on buttons for eye pupils (optional).


***Please do not copy/claim this pattern or distribute it.  I would be happy to see your final results and if there are any questions regarding the pattern, please don't hesitate to ask or email.  You may sell the finished results but all I ask is credit for the pattern. Thank you!

I wrote this pattern out as I was making my test owl, so I have no made a 2nd one based solely on following the pattern.  Please let me know if there are any mistakes or parts which are no understandable and I will do my best to help/fix it.  


#owl #pattern #amigurumi #crochet #toy #animal

Wednesday, July 4, 2012

Happy Fourth of July!!

I hope everyone is having a wonderful day today, maybe with some BBQing going on and fireworks tonight!! We will be making up a batch of homemade caramel popcorn (search post history for this recipe on my blog) and bringing it along to the bay for our town's big firework show.  Somehow it always seems to take longer than the year before to get it started up, so popcorn is a good waiting tool! :D 

For everyone without power- may you get it back soon!
For everyone in the scorching heat- may a cool day come your way!
And for everyone having a rough day- CHEER UP and look ahead to brighter days around the corner! :)

---Mr. Seahorse OH SO CUTE and cozy looking! :)

Monday, June 18, 2012

Sourdough Bagels (recipe)

Hello!  Tonight I am going to share a recipe for homemade bagels that I made yesterday (and are gone already!!).  I posted a photo to my instagram account (@belleandrew) and the recipe is below: 

SOURDOUGH BAGELS:
1 cup sourdough starter*** (see below)
2 eggs
3 tbsp oil
2 1/2 cups flour
1 tsp salt
2 tbsp sugar

In addition you will need a large boiling pan (like you would use for spaghetti noodles, say) filled 3/4 with water and 2 tbsp sugar.  

In a stand mixer bowl (with dough hook attached) combine the starter with eggs and oil.  Mix together flour, salt and sugar.  Add to starter mixture.  Mix on low speed for approx 8 minutes, adding enough additional flour for the dough to leave the sides of the bowl.  Cover with a cloth and place in a warm area until doubled in size.  (1 1/2 to 2 hours).  Turn out onto lightly floured surface and divide into 12 equal pieces.  Round into a ball and poke a hole in the center using your fingers and stretch/pull gently to create the bagel shape.  Cover again and let rest 20 minutes.  Meanwhile boil the pan of water with sugar in it.  Drop each bagel into the water one at a time.  Only boil a few at a time.  Cook 7 minutes, turning once. Drain; place on a cookie sheet lined with parchment paper.  Bake at 375* for 25-35 minutes (depending on your oven...mine only took the 25 min), rotating pan halfway through baking.  Bagels should be golden brown.  

Makes 1 dozen bagels.

Once you get the hang of making them, you can add various extra ingredients for a variety of bagel  types!! Store in an air-tight container or large ziplock bag.  Enjoy!

***A quick note about the sourdough starter... I keep one on hand all the time in my kitchen, but many people don't.  You can look up a basic sourdough starter recipe online (try www.allrecipes.com) and use just about any you find to your liking.  Be sure to use it at its bubbly peak for this recipe to get the extra punch and tang of sourdough!  

Any questions or comments, please don't hesitate to drop a line! :)

Wednesday, May 30, 2012

End of May already! Plus Instagram!

I can hardly believe it is the end of May already.  Some schools in different areas of the country are getting out already for Summer break even!  Here they are making up for the snow days taken off in the Winter, so they still have another couple weeks.  I'm kinda glad (haha). :D

I continue to have difficulties with uploading photos onto my blog, which makes me sad.  I don't know if it's a blog thing, computer thing, user error, or what...?? I never had issues prior to the last couple months.  I'm going to keep working on it.  BUT...in the meantime, I finally made an account over at good ol' Instagram.   I mostly just post photos of my crafting goodies like I do on here, but much more frequently since it doesn't give me any issues like my blog does!  So if you'd like to be able to see pictures on a fairly regular basis of random crochet, clay, crafts, etc.... I am "Belleandrew" on there (as well as Twitter and Facebook).  Feel free to follow me on those! :)

I am in the middle of trying out the "plarn" idea with crochet.  Plarn being yarn made from plastic bags you get at grocery stores & such.  We'll see how that comes out and IF I can get photos to work on here, I'll post it.  :) :)  Hope you're all having a great week!


Thursday, May 3, 2012

Bug-Eyed Owl and Rainbow Blanket (crochet)

Hello everybody :) How is your May starting off?  We are getting rain (as usual) but today was just sunny enough to be able to get a few quick photos taken in the back yard. 

This big bug-eyed owl toy was a pattern from a book by VooDoo Maggie. I don't have it on hand to put the exact title, but I'm fairly certain no one else has that name if you go look it up!  The book is full of unique crocheted toy patterns that don't look like everything else out there. (A plus!)  

 Second up-- a rainbow stripes blanket with fringe/tassels on each end.  This is crib-sized, or lap sized if you like.  One end has red tassels and the other has purple. I couldn't decide which color, so went with both. :D  I will be posting this one in my Etsy shop as soon as possible.  

For everyone enjoying sun right now.. LUCKY!! And for those of us in the rain.. at least we have an excuse to stay inside and crochet. :D 

Saturday, April 28, 2012

 Heyyyy!!! My photos are actually uploading!  And this is after a few days of trying and giving up.  Ugh.  But now that I got it to work, I can show a couple of finished purses I've made in the last couple weeks.


Both of these granny square purses are crocheted and using up scrap yarn.  All in Red Heart brand.  The black one I used purchased handles (from Jo-Anns) and chose clear ones so they wouldn't distract from the colorful bag too much.  I didn't have a pattern, just made up squares and sewed it all together. 


This second one is with white outlining.  After I'd finished the black one above, my SO was looking at it and drew up an idea for a "lopsided" design for me to try.  So I did and this is how it turned out.  I love, love, love it!! It is big enough to hold something magazine-sized.  Even the handle (which is long enough for it to hang at your hip) is granny-square styled!  


Both of these bags are available for sale in my Etsy shop (they're already listed) if you're interested!  Pop on over and take a peek..there's also more photos. :)

Sunday, April 15, 2012

Hmm...must try again later...

Well, I was all prepared to make a post but I'm having "technical difficulties" with uploading the pictures! lol...so, I think I am going to step away and come back this evening once I get that figured out. :(  Sorry about that!

Wednesday, March 28, 2012

Cream Cheese Banana Cake Bars (recipe!)


How many of us are really glad Spring has finally arrived?  Even though we still have the chilly morning temperatures and the occasional frost on the ground..Spring has definitely arrived.  The mid-day is sunny and almost-warm even!! Great time for making these bars as a special treat. :)

CREAM CHEESE BANANA CAKE BARS
1/2 cup butter, softened
1 1/2 cups sugar
2 eggs
1 cup vanilla yogurt (or plain)
1 tsp vanilla
2 cups flour
1 tsp baking soda
1/4  tsp salt
2 mashed bananas

for the cream cheese topping:
1 (8 ounce) package of cream cheese, softened
1/2 cup butter, softened
1 tsp vanilla
roughly 4 cups powdered sugar

In a mixer, cream together the butter and sugar. Add the eggs, yogurt and vanilla.  In a separate bowl, combine the flour, baking soda and salt; slowly add to the creamed mix.  Stir in bananas.
Spread into a greased 15x10" baking pan (OR use a couple of smaller cake pans). Bake at 350* for 20-25 minutes or until a toothpick inserted near center comes out clean.  Cool completely on a wire rack in pan.

For the topping, beat the cream cheese, butter and vanilla.  Gradually add the powdered sugar and allow to beat until desired consistency.  Frost the banana bars. Store covered in the fridge any unused portion. :)


Friday, February 17, 2012

Monster and Bear Hats (crochet)

Monster Hat!!!!!!  Even though it's a monster, it's hard to not think of it as cute. :D  I was asked to make this hat for one of my nieces and I was more than happy to do it.                                                The pattern is from www.emiegracecreations.etsy.com and was well-written to follow and make it look exactly like the one in the Etsy.

I can see where it would be very simply to make variations on this hat for a million different looks. :)


And a bear hat!  This one is actually my own pattern/design.  I was asked to make a bear hat and although I have patterns for several different animal hats for kids, bear hat is not one of them.  When googling images of other bear hats to get an idea of what they look like, this is about what I was seeing...in various colors.  I like this one but I think I might like it even more if it was a dark brown with tan accents. (the opposite it is).  

This particular hat will be a give-away item on another blog soon- stay tuned for more info!! :D

Monday, February 13, 2012

Crochet Candy and Clay Gnome

Good afternoon! Wow two posting days in a week...I'm shocked at myself. :)  And I even have a bit of the flu going on today, so I'm amazed anything is getting done at all.

Well for starters, sharing a cute little candy...uh..thing.  I didn't have a pattern for this, just made it up.  It became part of one of my niece's birthday gifts last month and she can put it on a necklace or barrette or whatever she likes.  Or add it to her play kitchen foods! :)  One of these days I'll write up a pattern for it hopefully!


Another garden gnome pick to add to my growing collection! This time he actually IS a gardener, complete with watering can and a flower behind his ear. :D  I do wish I'd gotten a better picture of the back..he is one of the only ones I've made without a jacket because he is wearing over-alls with suspenders and I wanted to see that.  But anyway, he is living with the rest of the gnomes now and he makes an even dozen so far that I have managed to keep. :) I'll have to get pics of the whole set soon to share.

Saturday, February 11, 2012

Pie Afghan of many colors (crochet)

 This is one of those projects I couldn't wait to share!  I bought a Leisure Arts book called "Great Grannies: 7 scrap afghans" from Amazon.  I want to say it was around $8 or $9 but definitely worth it because all 7 of the creations are now on my to-do list.  Not like some books you buy and only want to make one or two of the things inside. 


One of the best parts, aside from the wonderful photos and unique blanket ideas that aren't in every single other crochet book... is that they are all made using only small bits of yarn for each motif.  And you don't have to be an extremely experienced crocheter to do these!!
 The blanket I chose to do first is called "Piece of the Pie" and you can probably see why.  Instead of all squares, it is all triangles!  136 to be exact!  I didn't even care about which particular colors I put together, just used up every bit of scrap I had and then started in on make dents into new skeins.  The whole project is using Red Heart Super Saver yarn. Normally it would take me a while to finish a blanket, but I was so excited to see how this one turned out that I completed it from start to finish in only 13 days!
The only problem I ran into were making the white circles that attach the points together (in the center of each hexagon).  That part is done after the whole blanket is sewn together and for some reason, the pattern wasn't telling me quite right how to do it...so I just made up my own way and it worked out just fine.  Maybe the pattern was wrong...maybe I was.   ??  Either way, you do that, then add the outside border and voila! All done. :)  

It's just over 4' by 5' or so... great throw for the couch or use as a bigger lap blanket. :)  
Haven't decided wether to sell or keep this one yet...I suppose if the right offer came along, maybe.  But for now it is living comfortably in a clear bag (so I can still admire it) next to the couch. :D

Tuesday, February 7, 2012

Angry Birds, Mike Wazowski, and Beanies! (crochet)

Good evening!  I can't believe it was actually 62* outside today when just a couple weeks ago it was snowing and 15*! Crazy weather can't make up its mind.  No matter what kind of weather it is, it's always fun to make hats. :)

The pattern for this awesome Angry Birds hat came from a youtube.com user by the name of "tjw1963".  She has a video showing how to crochet it as well as links to the written pattern.  I made this particular one for one of my SIL's husband. 


These six were for family members.  I'd asked each of them before Christmas what their 3 most favorite colors were and here we are.  Now they all have their own custom colored hat!  Just basic beanies. :)


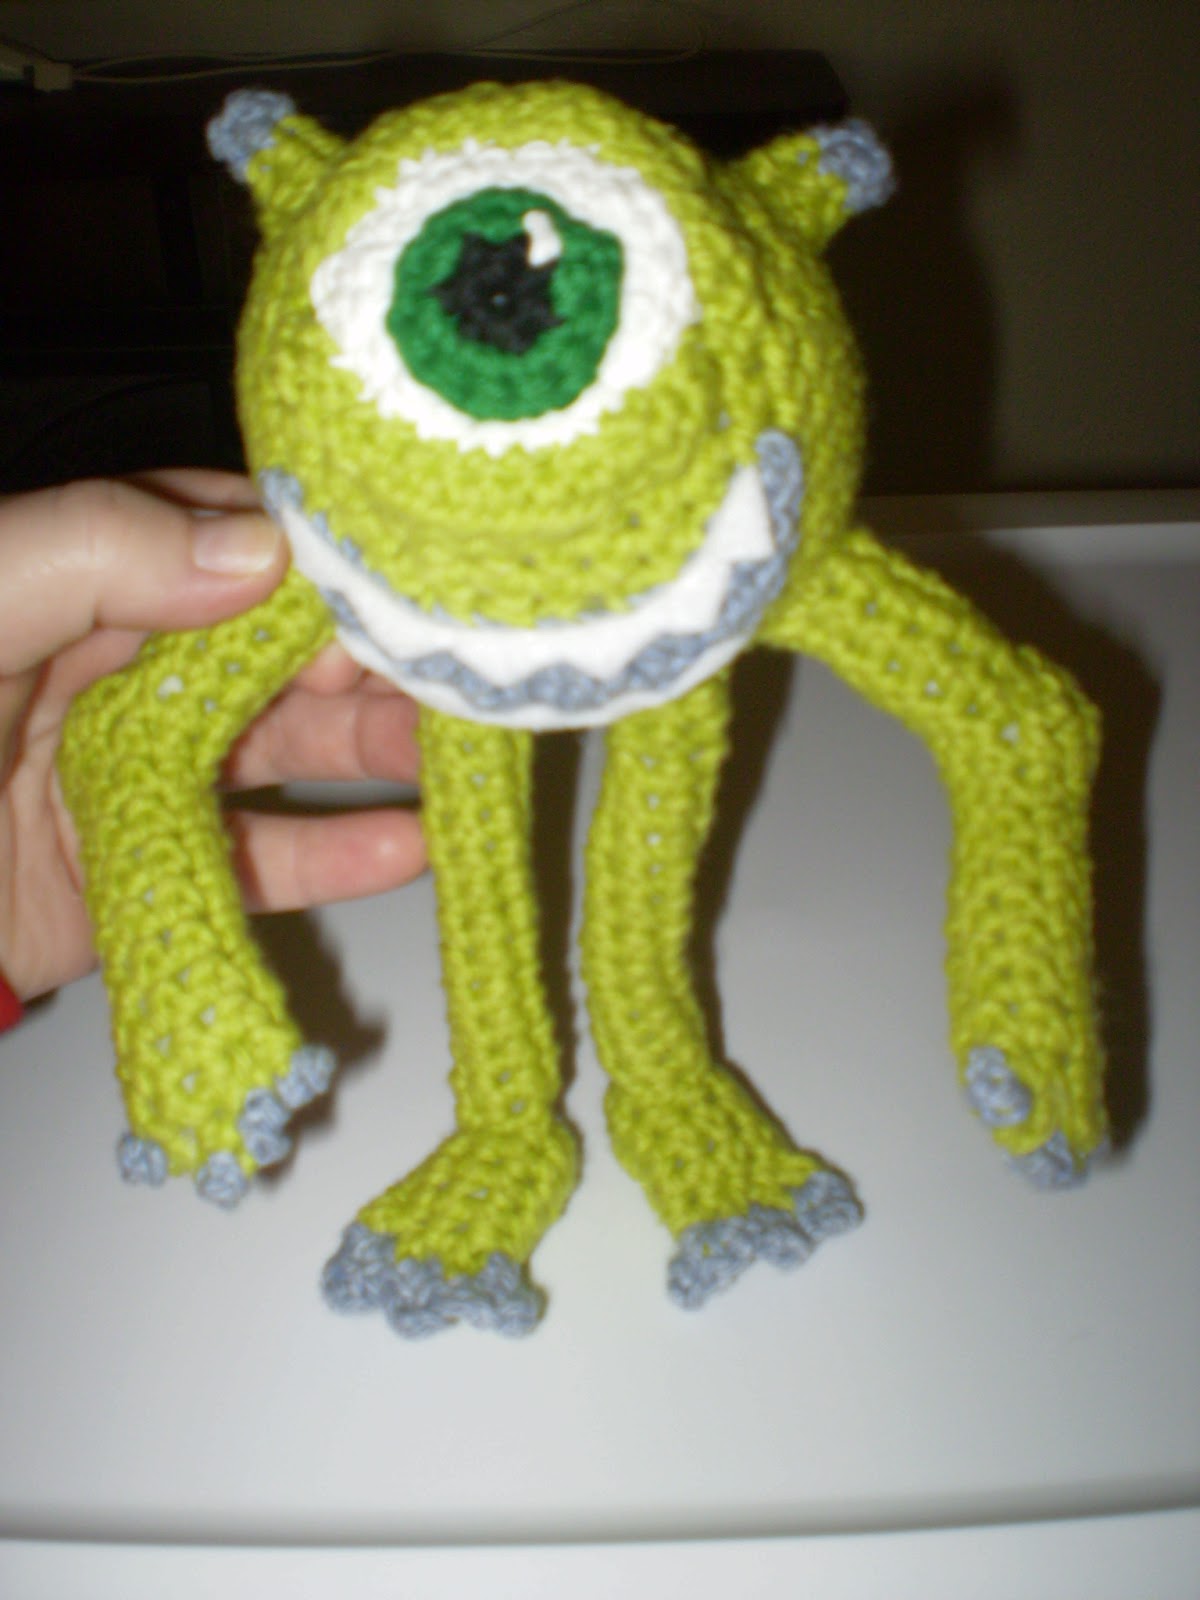
And finally for tonight.... an amigurumi Mike Wazowski toy (from Monsters, Inc. movie).  I don't know why the photo came out with him looking a mustardy-green color... he is actually more like lime-green.  Like the cartoon!  Silly camera!

I made him for one of my nieces who just turned 3 and is going through a "Monsters, Inc." phase.  Unfortunately I did not write down how I made him as I went along, though I really wish I had because he isn't from a pattern- I just made him up.  I do think if I made another one, I'd make his head/body bigger.  But for a first try, I think he came out pretty good!

His mouth, by the way, is crocheted grey underneathe, but the teeth are cut out of felt and craft-glued on.  I tried crocheting the teeth in several ways and it was just not happening....so felt it was!! What do you think of the final guy? :)


Off to work on more projects!! :)  Hope everyone enjoys the pictures above and maybe get inspired to make some as well. :)

Monday, January 16, 2012

Throw rug and granny square pillow (crochet)

Good evening!! I am back from a somewhat-partial break after the holidays.  Here we are over 2 weeks into the new year already, so I figured I better make myself present! :)

 How did everyone's holiday go?  I am back into the full swing of things around here and currently working on a nifty blanket which I hope to share soon.  For now, though, I can start sharing things that were made as Christmas gifts that I couldn't share before in case anyone peeked here and saw! :D


This awesome rug started off as 16 (yes SIXTEEN!!) skeins of yarn in very, very random colors.  If you look closely you can see there are 2 different striping patterns...one with 8 colors and the other also with 8 colors.  Individually the yarns were actually rather ugly and none of them matched or coordinated.  But when you put them all together, they turned into this fabulous thing and were a great way to use up a lot of out-dated yarns! (I inherited a bunch from my grandmother and this throw rug thus became a sentimental gift for my mom!)  P.S. I used a "Q" hook and just did an oval, working extra stitches (all in SC) where needed to round out the ends and such, but there are plenty of patterns and books available, too, if you wanted to use them.

 Next up is one of my newest favorite things to work on (granny squares!).  This was also a gift for my mom, although this time I picked the colors on purpose to match ;)  No pattern was used, just bought a 14x14" pillow form (around $6 at Walmart) and started working a basic granny square (I believe with an "H" hook) until it measured big enough to fit across one side of the pillow.  Then I made an identical second one, held the two together and worked a SC border through both thicknesses on 3 sides (working in extra stitches around the corner to keep it flat and nice), stuffed the pillow into it, and finished up the 4th/final side.  Weaved in ends and voila!  :D 


Up close view of granny square pillow :)


Alrighty, I've got to get more photos downloaded to share for next time, but I hope everyone is having a wonderful start off to the new year!! :)

Saturday, December 17, 2011

Hippos, Aliens and Nails!

Hello! I hope everybody is having a fabulous weekend! This is always the busiest one for us around here because this is crunch-time to get goodies in the mail before Christmas.  I'm fairly positive we're not the only ones in this boat!! :D  Just remember...relax and breathe every once in a while in there! :)

This cute little hippo is a toy I just finished this morning and he is newly listed in my Etsy shop if anyone is interested! I can also make him in other colors as a custom order...but beware it would be after the holidays when things are back to normal around here. :)  Feel free to send an email for info!


I love this thing.  The pattern is from a new book I bought from Amazon called "Crocheted Softies".  I did modify just the slightest bit to suit my needs, but not enough to say it's my pattern or anything...still very much the author's.  And he already has an established home (currently under the tree, but I'm sure he'll be in a pile in someone's bedroom soon after the holidays). 


When I get extra time, I would really love to branch off of the basic idea on him and make more aliens all different looks!


And some Christmas nail art I did for a friend.  All of the nails are painted with a base clear coat, then with a white polish.  Alternating nails have a red/green glitter coating and the others have very simple snowman faces dotted on (you can use a toothpick!).

Very simple and great for this week!


I will have much more to share once the holidays are over...right now it's hard not to, but I don't want to spoil any surprises for anyone who might peek here!! :D  Have a great weekend, all!

Sunday, December 4, 2011

New Etsy Listings

Good evening to all!!  Just dropping in a quick note to say that I've listed several new items to my Etsy shop at www.maebellecreations.etsy.com over the last few days.  Trying to get a selection up in time for holiday gift buying, so if you're looking for shopping ideas- head on over there and take a peek!  No two things are exactly the same and you are bound to find something that any age range can enjoy.  :)  Also, always feel free to send me an email if you'd like to discuss a custom order or idea!  

Have a great rest of the weekend!! :)

Tuesday, November 29, 2011

Candy Cane Nails and Amigurumi Squid!

Hiiiiiii!! I keep trying to be more diligent about adding posts to my blog but I swear this time of year is always the biggest challenge.  Lots of things on the ol' to-do list!


Here's an easy holiday nail art design that almost anyone could do.  Peppermint candy cane!  Simply apply a base coat to protect your nails, then paint the entire nail white.  Allow that to dry a couple minutes, then add red stripes in varying thicknesses either using a striping polish, or a thin paint brush from the craft store!  Finish with a clear top coat and you're all set!


I'm sure everyone knows being close to the holidays, it gets harder to share things on here since a lot of what I make are for gifts and I wouldn't want to spoil any surprises!! But that doesn't mean I haven't made anything outside of that... :)

This little crocheted guy (squid) was a special request as a Christmas gift for someone through Etsy.  I will be shipping him off tomorrow morning to his new home.  

I have also been adding new items to my Etsy shop for those looking for any holiday gift ideas... everything is unique and there's a lot of variety!! Check it out :)

www.maebellecreations.etsy.com      Also feel free to contact me about custom orders!

Friday, November 18, 2011

"Chinese Acrobat" hat (crochet)


This crocheted hat is called a "Chinese Acrobat" hat in one of Leisure Art's latest pattern books all about hats called 'Heady Affairs'.  There are 7 hat patterns altogether and they all seem to be on the above-beginner level side.  Several of them feature cable patterns or other complex designs rather than just your plain ol' beanie cap.  

It took me a couple of days to complete this one and it was made for someone specific for Christmas.. so hopefully he doesn't see this any time soon! haha :D  

I do recommend the book if you want some different styles of crocheted hats and are ready to take the next step up from beginner patterns. :)


On a separate note, I will be adding several jar necklaces with mico-mini polymer clay gnomes, candies and snowmen to my Etsy shop this afternoon.  If you are on the hunt for holiday gifts, head on over and check it out!  www.maebellecreations.etsy.com

Friday, November 11, 2011

Pink Cable Hat and Purple Neck Warmer (crochet)

Happy Veteran's Day to everyone!! And a special big Thank You to all veterans out there :) 

Today's post (just had to have one on 11/11/11) I have a couple of new crocheted items that I've done over the last week or so.  Above is a pastel pink hat done in a cable stitch.  It's the first time I've tried making a hat using that stitch pattern...and considering that, I think it turned out great! :D  Adult size (or teen) and thick, so very warm.  I will be listing it on Etsy in the near future...if you're interested before I get it listed, drop me a line. :)

And second, a beautiful neck warmer in a fluffy, soft purple yarn with bright purple buttons to close it. This pattern design came from one of my more recent Crochet World magazines and was relatively quick to make.  I love that it has a popcorn stitch in it for some variety on the look and also to make it a bit thicker and so, warmer.   I will also get this listed on Etsy soon and as above, drop me an email if you're interested in purchasing it before I have a chance to list it.  

I did also make another of these in the exact same style/yarn but with a mint-green color. :) 

www.maebellecreations.etsy.com                maebellecreations@hotmail.com