

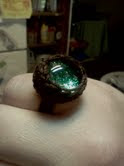

I absolutely love crafts that are easy to do and are inexpensive to try. These 3 rings are all made with cabachons (or flat-backed clear marbles) that I bought in the floral department of the craft store. You simply paint the flat side with a sparkly nail polish of your choice and let it dry. Then glue it to either a ring finding (far right photo) or you can do like I did and crochet a little setting and band with size 10 cotton crochet thread. For those two on the left, I used a dab of hot glue in the inside to push the bottom of the rock onto so it would be sure to stay, even though I did the setting portion pretty tight so it wasn't likely to fall out even without the glue.
If anyone is interested in knowing how I crocheted up the setting and band, please leave a comment.

For this design of 5 different Halloween monsters, I was inspired by a Youtube user by the name of "IHaveACupcake". She makes very clear videos and always manages to make them look easy. ;)

And last but not least...candy corn inspired stripes!! This was my own idea, though I'm sure other people have probably done it. I don't know why the photo is so darn big compared to the others either..??? Oh well :)
Here's how I did them:
*base polish on bare nail first.
*paint whole nail an opaque white color (I used "snow me white" by SinfulColors)
*paint the nail tips a yellow of your choice (I used "the wonder yellows" by WetNWild)
*paint a stripe in the middle with an orange of your choice (I used "9.0.2.1.Orange" by WetNWild)
*finish up by letting the paint dry a couple minutes, then cover with a fast-drying top coat
That's it! :) These WetNWild colors are new, and they all seem to have t.v. show themed names... The orange is great- has a golden sparkle in it and the yellow is more of a pearly color. I recommend them. :)


