Thursday, September 30, 2010
Crochet carry case
Any suggestions on what this could be used for? I whipped it up while watching a movie last night, but didn't have any pre-thought-out use for it. Maybe a sunglass carrier or phone...anyway I liked the colors. :D
Wednesday, September 29, 2010
Big Button Arm Band :)
Over the weekend I spent some time going through a few boxes that I had packed away so long I forgot what was in them. Ever happen to you? Well one of them had some bits and ends of yarn..not really big enough for a scarf or hat, or even a pot-holder.. but big enough to make little girls' arm bands. :) So I made a few and added some big, sparkly buttons for extra spunk. Very cute, really simple and quick! Thanks to my S-I-L for getting my mind going around crochet again lately! hehehe :D
2nd pair of Elf Slippers
Monday, September 27, 2010
Adding spiff to t-shirts :)
Good evening :) I had actually made these shirts a while back, but never got around to posting them on here until tonight. I know a lot of people like to do the "freezer stencil" thing and put images on shirts...well I still haven't tried that method (I will someday!) but I did want to make these a little less plain, so here's what I came up with.
I needed to do 6 shirts, so after thinking a while, I decided on chess pieces. *First step was to go online and google some chess piece image outlines until I found 6 that were relatively uniform in their style/design. *Then I printed out a blown up version (one to a page) and cut the image out of the paper. *Put the image onto the backside of each kind of fabric I wanted to use and traced them with a pencil that would show up. *Cut out each image from its fabric and sprayed the "wrong" side with fabric adhesive, then placed the wrong/sticky side to the t-shirts and let them dry for about an hour. (I also put a piece of paper inside of the shirts to make sure the glue didn't go through and make it stick to itself). *Lastly, used my sewing machine and just sewed each image down around the edges leaving about a 1/4" border.
-You can see the Queen piece (me, of course!) done in purple swirly fabric
-the Knight (which was the girliest one and she loves horses...so I figured that works..) done in tinkerbelle fabric
-the Bishop with Simpsons fabric
-the King (other half's shirt!) in a green wavy fabric
-the Castle also with Simpsons fabric
-and the Pawn done with puppy dog fabric (for the littlest man of the house)
Saturday, September 25, 2010
Apple cookies
So a couple weeks ago, one of our neighbors dropped by with a box of apples from their back yard full of apple trees. They made absolutely the best apple-butter by the time I was done with them. And to repay the kindness, I made a batch of apple-shaped cookies to take back over! (Who doesn't love a bunch of fresh-baked cookies??) Buttery-rich sugar cookies with a cinnamon-flavored icing and sprinkled with red sugar. :) I hope they enjoy them as much as I did making them! :D
Leaf cookies
An idea for the holidays :D
http://www.craftbits.com/project/christmas-tin-can-luminary
After browsing through a bunch of holiday crafting ideas over at craftbits.com I decided this one looked like a simple idea that even younger persons in the house could try. And the designs are endless- anything you can think of to draw an outline of could be hammered into these cute tin cans! Check out the above link for the how-to's and credits. :)
For the giveaway, mentioned on the www.craftbits.com site, I would say a gift certificate is the ideal gift for me!
Thursday, September 23, 2010
Elf Slippers
Today was noticeably chilly, even in the house somewhat, so it is just about that time for the thermostat to be turned up for the season. And for house slippers!! Or in this case...elf slippers :D These cost less than a dollar to make using craft felt squares and embroidery thread. Oh and a couple of bells for fun :) We had some jealous siblings after these were finished so I think I will be making some more very soon!
*To make these, I simply traced the bottom of a shoe onto paper and cut it out. Then I traced that paper onto a piece of felt and folded it over to be able to cut out 2 identical bottoms. For the top/side portions, I found a template and adjusted it to the right size for the shoe bottom (so that it would come down about halfway). Then doubled the felt over again to get matching pieces.
* Lined them all up and sewed the top to the bottom. Then added the bells with a simple stitch.
* I decided after they were "done" the first time that the bottom was kinda flimsy by itself, so I then cut out another set of felt bottoms and hot-glued them on for double-thickness. (You can see the original bottom were brown, then I put red on the very bottom). You could probably use shoe inserts or something, but I was going with what I had on hand and these are just for the house anyway.
All in all it was only about a half-hour project! :)
Guess what's coming??
Wednesday, September 22, 2010
Giveaway
http://to-be-charmed.com/2010/09/21/giveaway-happy-gloves-book/
Go to the above link for your chance at a great crafting book! :)
Sunday, September 19, 2010
Birthday Party Cookies
Yum!!! We had footballs, cars, ice-cream cones, cupcakes, "J"s, "4"s and "3"s to make the perfect birthday party cookies for a little boy and girl. :) Each time I make the cookies, I learn a little bit of something to improve for next time. These were made with lemon extract in the icing and were fantastic! :)
Thursday, September 16, 2010
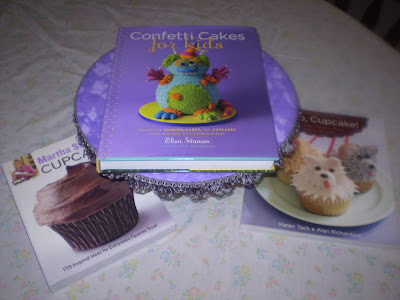
A few favorite cake books...
I seem to do a lot of recommending to people :) They ask, I have an answer! Usually, anyway... Well I thought I'd show just a few of my favorite cupcake/cake decorating books. :) Someday I will get a shot of my cookie books...and maybe the whole cookbook collection. Did you know that you can never have enough cookbooks? (Or aprons). :) Happy baking!
p.s. The cake stand is handcrafted by yours truly and available on my Etsy shop if you would like to see more photos!
Tuesday, September 14, 2010
Twirly Skirt #3
I can't get enough of these skirts! This is the 3rd one I've done for her and this time, made the top portion a little taller so the skirt would hang lower. It needs to go through the washer/dryer so it'll fall a little less stiff, but this pic was of her trying it on so I could make sure it fit. :) And it made good use of the left-over Tinkerbelle material I had on hand. Total cost for skirt = just under $3. :)
Monday, September 13, 2010
Mod-Podged Stools
If you're looking for an easy craft project to do and have little ones in the house, these are fun and practical! We bought 2 small black stepping stools at the local dollar store and 2 different scrapbook papers for $.20 each at the craft store. (Chocolate chips on one and polka dots on the other). Next we cut out a shape for the tops and four circles to go around the legs...and put on 3 coatings of mod-podge. If you try this, be sure to let each coat 'dry' for about 15 minutes before you apply the next one.
Now the kids know which one is theirs and they can use them for sitting around the coffee table or standing up at the bathroom sink. And I'm sure to climb and get into a few other places... hehe :D At least these are better than using my clean pans! :)
Sunday, September 12, 2010
Fruity Log Cookies
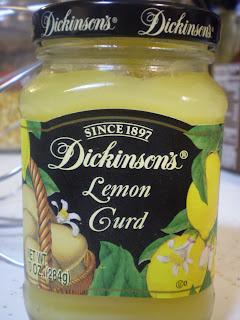
The weather is turning chilly by the day around here, so we know what that means... Fall is coming! Which also means...it's baking season! Time for cookies :) But really, when is it ever NOT time for cookies?! I found a jar of fig preserves in the peanut butter/jelly section at the store along with a jar of lemon curd. So that is what we tried although you could use just about any kind of jelly or jam you think sounds good.
Fruity Log Cookies
1/3 cup sugar
5 tbsp. butter, softened
1 1/2 tsp. vanilla
1 large egg white
1 cup all-purpose flour
2 tbsp. cornstarch
1/4 tsp. baking powder
1/4 tsp. salt
about 1/3 cup of fruit jam/preserves
(for glaze)1/2 cup powdered sugar & 1/4 tsp. vanilla & few drops water
1. Preheat oven to 375*.
2. Beat sugar and butter with a mixer at med. speed until well-blended. Add 1 1/2 tsp. vanilla and egg white; beat well.
3. In separate small bowl, combine flour, cornstarch, b.powder and salt. Add flour mixture to sugar mixture, stirring until well-blended.
4. Turn dough out onto lightly floured surface. Dive into 2 portions. Roll each portion into a 12-inch log. Place each log on a baking-sheet lined with parchment paper. Form a 'trough' down each log using the handle of a wooden spoon or your index finger. Spoon fruit down the center.
5. Bake at 375* for 20 minutes or until lightly browned. Remove from oven and set on cooling rack.
6. Combine powdered sugar, vanilla and a few drops of water; stir well. Drizzle over warm logs. Immediately cut logs into diagonal slices (12 each); don't separate slices. Let cool 10 minutes; separate slices. Move them onto wire racks to cool completely.
Yield: 2 dozen
Enjoy! :) These are fantastic with a cup of tea or coffee :)
Friday, September 10, 2010
Tutorial: Button Ruffle Scarf
Oh my goodness...with fall and winter coming up, these are just perfect! I am going to try making one either tonight or tomorrow and will post my results. :) Thank you to the "Living With Punks" blog for posting the tutorial! :)
Very cool G.I.T.D. food!
http://www.ourbestbites.com/2010/09/kids-in-kitchen-glow-in-dark-food-magic.html
I was browsing around some of my favorite crafty sites and came across this post from today over at "ourbestbites".com It features glow-in-the-dark food and other fun stuff to do with kids. Loving the idea!! Check it out :)
Thursday, September 9, 2010
Another twirly skirt :)
I just had to make another one! Yesterday's was so easy (for a mostly-non-sewer like myself) and she liked it so much, I had to do a 2nd one. The bandana portion is dark brown with white designs and the only thing I had to remotely match it was a brown and white checker print material. I wasn't so sure about it at first, but now that it's completed, I like it a lot! :)
Wednesday, September 8, 2010
8-Pointed Twirly Skirt
Saturday, September 4, 2010
Chocolate-Peanut-Butter Fudge
Yum yum!! Today's post and recipe is all about the sweet tooth! :) This is a quick, simple recipe that is difficult to mess up so if you've never made fudge before or don't think you have time for it- try this one. :)
Ingredients (pictured above):
8 ounces semisweet chocolate, either coarsely chopped or chips
1 cup creamy peanut butter
1/2 cup butter
1 cup powdered sugar
1 tsp. vanilla extract
Step 1. Line an 8x8inch square pan with foil and lightly grease the foil.
Step 2. Place the chocolate, p.b. and butter (cut into smaller pieces) in a heatproof bowl and set it over a saucepan of simmering water, stirring until chocolate melts and the mixture is smooth.
Step 3. Turn off heat and whisk in sugar and vanilla until smooth and well blended. Quickly put into the prepared pan and spread out evenly.
Step 4. Cool it in the fridge until firm. Cut into squares and enjoy! (keep refrigerated when not being eaten).
Yum!
p.s. Once again my pictures are out of order and I intended them to be in between each of the steps above...not sure why it isn't working, but you get the idea!
Subscribe to:
Posts (Atom)