Friday, April 29, 2011

Gnome!!!!! (crochet)


Hello!! I am sneaking this in before midnight for my Friday post. :) Let's start by showing how the legs were screwed up when I ran out of brown. :( See how they aren't the same? Welllll...how to fix that when I don't want to run to the store for a couple yards of one color yarn?? Add to the boot! (Think of it like cookies or cakes...the secret is knowing how to fix/cover up the mistakes!)


So here's what I did. I made up these little flaps out of the black color I used for the boots...


And then wrapped it around the legs at the top of the boots to make them even. :) Easy, simple fix! And you would never know I ran out of brown because it looks like I did them on purpose this way.


Showing off the hiney :P


And he seems perfectly fine with it!! :)

p.s. I have NO idea how my pictures got turned sideways and I also have NO idea how to fix it. So... sorry about that! I hope no one gets a crooked neck. :P

Thursday, April 28, 2011

Star Wars Yoda Hat (crochet)

This was yesterday's project all complete...a Yoda hat (from Star Wars, in case you live under a rock). The above photo is it laying down and below photo is standing on its own on my counter.

The pattern was written by my S.I.L. and given to me via text message on the phone...a few over 200 of them :D And in the end, I was able to follow her excellent directions to make this. All the credit for the pattern goes to her and I'm not sure if she'll be selling the pattern or just the hats from it, but if you'd like to contact her about any of it, she is at this blog - along with some photos of the yoda hat she made. :)

P.S. The one I did is sized for a child...the ears are decoration and the long tasselly-things are the earflaps (covers the ears and then hangs down).

Wednesday, April 27, 2011

Popsicle Stick Bracelets


The idea for this project came from a post on craftgossip.com several days ago. I saw it and thought- Have to try this!!! And it was so much fun! :) The original post is here and has all the instructions plus more beautiful photos of how her bracelets turned out.

As you can see from my pics, there are a bunch of the sticks drying inside of glasses. (This step is after soaking in water overnight and then bending into the glasses). I was making mine for little kids, so we used espresso shot glasses and smaller drinking glasses. It really doesn't take very much paint (cheap acrylic paint from the craft store) so we put little bits onto paper plates to paint from and each had our own plate. Then paint away and let them dry!! I made the four with the owls, gnomes, cupcakes and skull 'n crossbones.

A couple pointers... we did try this a few days prior with regular size popsicle sticks and found that more were breaking when trying to bend, and they were also too small to around anyone's wrist. So definitely go for the "jumbo" popsicle/craft sticks. I bought a box of 300 for $2.97 at Walmart. You will break some, but they're cheap and just go into it expecting that and make extra just in case. You can also mod-podge on these or I was even thinking of yarn-wrapping them with scraps of yarn. Possibilities are endless! Have fun :)

Monday, April 25, 2011

Crocheted Easter eggs and "bobnies"

I actually had more eggs than just these four, but *someone* found them and ran off to her play-kitchen...

A "bobnie" for one of my nieces. She likes pink and this one was done with all one skein of yarn that kept changing as I went... I like the effect it had.

And the other four "bobnies" (Peep-style bunnies that bob because they have no arms/legs/tail). From left to right, they have been named: Lucy, Carrot, Pat and Fred. hehehe :D My favorite is Fred on the far right, but don't tell the others..

P.S. Inspiration for these toys came from my S.I.L. over at THIS awesome site ...check out her blog and you can find a bunch more of these bobnies :) Though I think hers may have arms.. :)

Friday, April 22, 2011

Oatmeal Cookie Recipe

Oatmeal Cookies with Raisins

2 cups packed brown sugar
1 cup cristco (butter flavored if possible)
1/2 cup milk
1 tsp vanilla
4 cups quick-cooking oats
1 3/4 cups flour
1 tsp baking soda
3/4 tsp salt
1 cup raisins (optional)

Preheat your oven to 375*. Mix together the brown sugar, cristco, milk and vanilla. Stir remaining ingredients together in a separate bowl, then add half at a time to the wet mix. Shape dough into 2-inch balls. Place 3 inches apart on cookie sheet and flatten with the bottom of a glass dipped in water (to prevent sticking). Bake until golden brown, approximately 8-10 minutes. Remove from sheet and cool on a wire rack. Enjoy!!


^^^One of my favorite oatmeal cookie recipes. The raisins can be omitted if you choose, but I like them in! Perfect for a treat afterschool every once in a while and still quite hearty. Do make sure they cool enough to "set" before trying to move them off of the rack to eat...otherwise they will fall apart. They need the cooling time to set themselves up. :)

Thursday, April 21, 2011

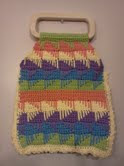
ZigZag Bag (crochet)


Front of bag..

Back of bag..

This sucker was a major paaaaaiiiiinnnn in the...... well, you know... to make. It took a total of maybe 3 days, but with about a month between each day LOL. I had originally done the backside of it in a totally different color scheme but it didn't match up with the front AT ALL when I went to sew the two together. That was frusturating. So then I got it back out and redid the back completely different and this time it worked out. I had a design idea for the front side, and this is a teeny bit different from it but still the same basic idea. The back is altogether not the same. All in all, I am happy with the *final* result, but doubt I will make this particular style again any time soon. hehehe maybe after some time when I've forgotten how complicated it was! :)

P.S. It will be making the travel with me to the craft fair and put up for sale...interested in it before it goes? Shoot me an email. :)

Wednesday, April 20, 2011

Cupcake Barrettes and Headband (crochet)


Wow my pics are just all over the place...hopefully when I post this it will all fall into place. ??

I made up a little pattern for a simple cupcake barrette and the first one looked so good, I decided to make a bunch. They are hot-glued onto alligator clip style barrettes that I also had hot-glued blue ribbon onto.

Then for fun, I made a c.c. with minty green "frosting" and put that one onto a headband. :) Bringing all of these with me to the craft show on May 1, but feel free to write if you'd like a custom listing of something similar on Etsy. :)

Sunday, April 17, 2011

Cookie Monster to-go cup cozy (crochet)


Here is an idea I had earlier tonight and decided to try it. I wanted to make a Cookie Monster to-go cup cozy...I think it turned out alright :) He even has a little cookie!


It's very basic for the blue part...just used HDC stitches about 33 across for however many rows it was to make it that tall (I didn't count lol). Then I made half-ball shapes in white (instead of a complete sphere for eyes, would've been TOO buggy) and made a semi-circle flat black part for the mouth. The cookie was a couple of rows in the round and then added some brown "chips". Sewed each part on while the blue part was still a rectangle....then sewed up the sides of the blue to make the cozy shape. :) Give it a try!

Saturday, April 16, 2011

Sleepy Owl, Skelly, Monkey, and Cup Cozy (crochet)


I finally broke down and bought a pattern for this owl off of Etsy. I couldn't help myself...it is so stinkin' cute and you can make it in so many different patterns/colors- the combinations are endless. Normally I don't like to pay $X per pattern because in my mind it's "why pay for one when you can spend just a little more for an entire book?"..buuuuut I really had to have this one. If you are interested, it came from Irene Strange on Etsy. :) If she ever writes a book, I'm getting it!!!


This little skelly is from the book "Creepy Cute Crochet" and although the patterns are written a little different from what I'm used to, I was able to figure it out and produce decent results. There is a little skelly bride you can make to put with him, which I may do in the future.


For some reason the way this guy turned out gave him a Budha belly hehehe. I don't mind, though..he also looks surprised that his picture is being taken. :P


And lastly, a very basic cozy for to-go cups. G hook, SC 33 each row and then the loops at the top and bottom was a simple matter of chain 5, slip stitch to the next stitch...chain 5, slip stitch to the next..all the way on top and bottom of the cozy. Then whipstitch the sides and ta-da. :) You can make these up so easily in so many different ways and so long as you have the beginning chain length the right size to go around the cup, you can just do anything you want and have a million different looks. :)

Thursday, April 14, 2011

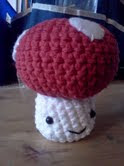
Amigurumi Cupcakes, Mushroom, Owlies :) (crochet)

Where to begin?! First of all...it is Spring, right? We woke up this morning to snow!! HELLO..snow! It was pretty (and cold) for a little bit. Glad I don't have to go out in it, that's for sure. :) Above^^ we have an adorable cupcake pair! And why is Bluey crying? Poor guy doesn't have any sprinkles!!!

As I said I would...I've been making more owlies!! Including one in the middle who seriously needs a trim. He is extra ultra fuzzy!! And to the right of him, I did one owlie with button eyes and really love the look of that one. I need to make more still. :) They're just too darn cute!

And lastly, I worked on Mr.Mushroom. It turned out about the size of my palm. Not too big, just the right size. He would fit good with the owlies and gnomes! :)

By the way...I have stopped listing new items in my Etsy shop for the time being until the craft fair is done/over (coming up on May 1). I am trying to build up my stock for the show. However- in the meantime if you see something you would love to have (or have made in other colors, perhaps) please don't hesitate to send an email. The addy is in the upper right hand side of this blog page. :)

Tuesday, April 12, 2011

Amigurumi Whale and Owlie (crochet)


Good afternoon!! Wow a post in the afternoon instead of the wee hours of the night...been a while. :) Finished up two little toys last night and I'm very happy with them both! The whale (sorry you can't see the tail in the pic) started out from a pattern for the first few rows of a circle (top of the head) and then I scrapped that and went with my own ideas because I didn't like how the pattern was going. He does have a tail, I swear!!!

Isn't this the most precious little owlie ever???!! I think it took less than a half hour total to make him, too. I'm going to do some others and make various sizes and colors. This was with a variegated yarn so it just did its own thing, which turned out perfect in my opinion. The blue under eyes, green at the top and purple body? Not planned! It just did it that way. :D Yay for days when the yarn is working on your team.

I have a feeling some of these little owlies will wind up in some easter eggs in the baskets ;)

Monday, April 11, 2011

Amigurumi Chicken (crochet)

As per usual..the pictures are showing up in the wrong order and even a couple missing. Why, blogspot, whyyyy????!! Anyway.. I've made a chicken!! Isn't it the funniest thing? I am noticing quite a pattern (har har) with the amigurumi patterns not having a TAIL for the animals! What is up with that? I *know* chickens have a tail...so I made one up for him anyway.
So now he has something to hold him up a little when he's sitting around...
I just think it looks tons better with than it did without. I've also been told now by a couple different people that he just needs glasses to look like Chicken Little. :D Not a bad idea!!

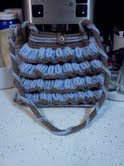
Brown and Blue Ruffle Purse (crochet)

This purse is finally finished!! It was a two-day project, which normally I wouldn't take on as quickly...but I thought I'd be done with it sooner than I was. You know, life happens and you have to take wee breaks :) For instructions on how to make the purse *handle* please see the bottom of this post!

Showing the inside and the button enclosure ^^

The bottom has a blue detailing line^^

Side profile view also with more blue detailing lines ^
^

And check out that handle!! I think that is what took the longest. And the ruffles. If you do any crocheting, and are especially familiar with amigurumi and how you start the body pieces for toys... the handle is basically like that:

You start with 2 chains, then 6 sc into the 2nd ch from hook. For the rest of it, you simply put 1 sc into the BACKloop only of each sc until it is as long as you wish. (Do not join at each round, it is worked in a continuous spiral). It makes it rather "boingy/springy" which is great for purse handles. As for the blue swirl that goes all around it, you simply join in your blue (or whatever color) yarn to any free loop at one end....then go up one row and over to the left one stitch and slip stitch. Rep all the way to the other end. :)


Saturday, April 9, 2011

Free pattern for to-go cup cozy (crochet)


This is only the 2nd or 3rd thing I've tried to write a crochet tutorial for...and I apologize for not having other pictures on this. I actually had taken 8 or 9 of them but blogspot is being a pain and not letting me upload them at the moment. *boo* Anyway, here is the pattern, please let me know if there are any issues with it. I'd love to see your finished ones, too, if you want to share!

To-Go Cup Cozy

you will need: G hook, worsted weight yarn in 2 colors (A and B), tapestry needle for weaving in ends

With A: ch 34, turn.
R01: sc in 2nd ch from hook and across to end. switch to B. Ch 1, turn.
R02: sc across. switch to A. ch 1, turn.
R03: sc across. ch 1, turn.
R04: sc across. ch 1, turn.
R05: sc across. ch 3, turn.
R06: sk first st, dc into next, dc into the skipped space. *sk next st, dc into next, dc into previous skipped* rep
across. ch 1, turn. <---(you are making criss-crosses for this row, basically)
R07: sc across. ch 1, turn.
R08: sc across. ch 1, turn.
R09: sc across. switch to B. ch 1, turn.
R10: sc across. switch to A. ch 1, turn.
R11: sc across. On last st, sc 1 more and then working down the side, sc across to end. This will give a neater
appearance. Fasten off, leaving an 18" tail for sewing. Overlap the side with the SCs to the other side to form the cozy and stitch neatly through both layers. Weave in all loose ends.

This pattern is free for your use and not for you to sell or pass off as your own. Please give credit if you make/sell items from this pattern. Thank you!

Thursday, April 7, 2011

Amigurumi ducky, bunny and also a Tinkerbell cake ;) :D


Busy, busy, busy!!!! That describes me these days :D Trying to get as much stuff done as possible for the up-coming craft fair and also doing cakes for friends while I'm at it!

The ducky and bunny were two little amigurumi toys I finished up yesterday and they turned out sooooo cute!! The ducky wasn't supposed to have a tail but I thought he needed one, so I added it. He *almost* looks like Tweety Bird from Looney Tunes, don't you think?..just a little bit anyway . The bunny is close to one of my favorites so far because of the detailing. It is felt on the inside of the ears (sewn in by hand) and also for the muzzle/nose/mouth on the face. The carrot is from a long time ago when I made it, but thought it'd make a cute photo prop!

Both pattern inspirations are from "Amigurumi World" though I changed them a bit. The bunny's feet, arms and tail (which wasn't part of it either...I don't know why these toys don't get tails!!!) were all my own because I didn't like the suggested ones.


And of course...Tinkerbell cake! This was actually from a few days ago, but I haven't had a chance to post it. A friend's little girl turned 3 and wanted Tinkerbell for her party, so I was in charge of the cake-ness and here it is!! I am pretty pleased with how it turned out. Sometimes doing the "eyes" on cakes gives me a little trouble but I think this was good. :) She absolutely loved it and that is what counts the most. :)

Tuesday, April 5, 2011

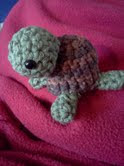
Amigurumi - Turtle Baby, Bumble Bee and Owl Ornament (crochet)


I have been a busy bee (har har..see below) and managed to overdo it today with these little guys. :) Trying to do something new all the time is pretty easy if you crochet and have the world of online inspiration and books galore! This little baby turtle took less than 45 minutes to finish and you can see how small it is in my hand. Very adorable :) The pattern was from the book "Amigurumi Two" by Ana Paula Rimoli. I love her books and directions...very easy to follow and such cute toys.


This bee is also from the same book "Amigurumi Two". There are two bees in the book, actually- a momma and a baby. This one is the baby :) It turned out even a little bigger than I thought, so I imagine the momma bee is quite big.

The owl!! First of all, I may have to keep him. :D I had searched and searched online all over the place..... Etsy, Ravelry, Google, Craftster, Craft Gossip, etc. etc. looking for owl patterns and there was one in particular that kept grabbing my attention and I really wanted to make it, but alas...no funds in the ol' Paypal just at this moment to buy the pattern. So instead, I decided to make my own using my learned-in-the-last-few-months knowledge of how to make these little toys and this is how he turned out. :D Overall it is similar LOOKING to the one I was keeping fresh in my mind, but not the same and she was using different stitch types and no buttons and I have no idea how she did the top, I just sorta winged that. But I am happy with this because not only is it my own design ...but it actually turned out well and I like it. :) Now I just need to make a whole bunch in different colors and find a spot to put them!