Monday, February 28, 2011

Watermelon Circle Purse (crochet)


Fruit-themed items seem popular right now. Everywhere I look there are fruit-ish clothing and accessories. Such a fresh idea for Spring!


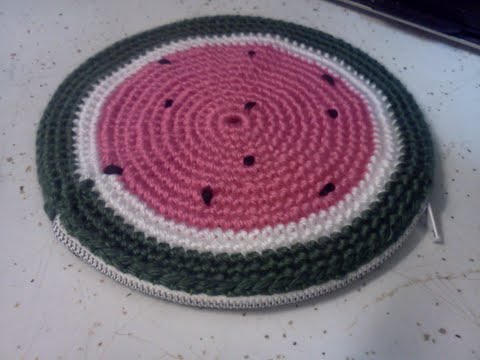
I made another circle purse with 7" zipper. This time I decided to play around with some design ideas for the yarn colors and went with "watermelon". I am pleased with the way it turned out and during the process I thought of several other ideas to try. Not going to spoil it yet, but if I get around to making them too, I will post photos! :D

Sunday, February 27, 2011

Clover Headband (crochet)


With St.Patty's Day coming up just around the corner, why not make a clover headband?? The headband pattern is from one of my older posts here and for the clover, you can just google a free pattern and find one that you like. There are tons out there of different styles of clovers and shamrocks. Some have the rounded leaf like I used in the photo, and some have the leaf with more of a heart-shape to them. Whichever you prefer, just sew it onto the headband and you're ready to go!!

Saturday, February 26, 2011

Amigurumi Giraffe (crochet)


No, this isn't the making of an amigurumi horror movie....but it looks like it could be one! These are all the pieces it takes to make Mr. Giraffe in the photos below. :)


Strike a pose!


Let's see the other side!


Extreme close-up! :D

Once again, using the same book as the last few animals posted. I am using 100% cotton yarn Sugar & Cream brand. I love working with it and it produces a nice, crisp look. The eyes are 6mm safety eyes. I don't know why, but none of the craft stores around here sell those, so I buy mine either on Ebay or Etsy depending on how many I need.

I showed this giraffe to my sister and she said he needs a scarf or a necktie or something, so I may be adding more to him when I get time. :) But for now he gets to go "au naturel" hehe.

Friday, February 25, 2011

Amigurumi Baby Seal and Alligator (crochet)


This baby seal is a good example of how something that didn't come out quite right can be fixed! The photo on the left is the finished seal from the pattern. (Which is from the same book as yesterday's monkey post). Notice how the body is twisted a bit and the flipper is up in the air? It isn't really supposed to look like that. So either the pattern was funky or I did something wrong while making it. BUT...I did some brainstorming and decided to make a little ball to attach to his flipper and tada- it looks like it is supposed to be that way. :) Originally I was thinking of making a ball to put on his nose anyway but this works out better to balance him out.


And an alligator!!! :D I love the green colors and the teeth on this guy. He worked up pretty quickly and I didn't have any issues with the pattern. (same book) I think if I did it again, I might consider giving him longer limbs that have a bend in them like the real ones but it is still adorable this way and probably less scary-looking. haha :D

Thursday, February 24, 2011

Amigurumi Monkey and Banana (crochet)

Hmmm...I still don't have a name for this guy, but I am very pleased with how it turned out. The pattern is from a little book called "Vanna's Choice Easy Crochet Critters". It was $4.95 and I ordered from Amazon.com and it came in yesterday so that is the first thing I decided to make from it.

The banana was not part of the pattern. I figured he needed something to hold and that sounded logical, so I just sorta made it up. I wish I would've written down what I did because honestly it's one of those things I don't think I could repeat and get the same results twice. lol Here is another angle:


Close up of the teeny banana!

Wednesday, February 23, 2011

Triangle Shawl (crochet)


The whole shawl folded kinda in half...


Close-up of the bottom "corner"...


This is the freebie pattern I used to make the shawl. :) I am pretty sure you can go to the Red Heart yarn website and get it on there directly. I left off the tassel when I made mine because I thought it looked kinda funky but if you like it, go for it! Overall it was about a step above beginner/easy but wasn't difficult. The most challenging part were the first few rows making sure you get everything in the right place, but once you do that..the rest is just repeating so it's pretty straight forward.

My whole household (and myself included) has been sick the last several days so that's why there's been a break in my posts. (Sorry about that) :( But this is what I worked on during that time when I felt up to it, and finished it up this morning. :) Hopefully I can be back to more regular posting again :) Go away, flu!! :P

Thursday, February 17, 2011

Vintage-Inspired Circle Purses (crochet)


Over the last 2 days, I made these two little purses. They don't have handles or anything, so I guess they'd be called a clutch. They have 7" zippers along the top that match the color of the yarn and were hand-sewn into them after I finished crocheting. Let me tell you how much fun it is to sew in a zipper!!! (ugh).


And here is the open view. :) I really love how they turned out and the yarn I picked (Carron Super Soft, fairly inexpensive and 100% acrylic but you'd never know it by how soft it is...) was perfect.

Anyone who has tried to make circles before with SC stitches probably knows how it starts to turn into a hexagon shape after a while...I found the trick with keeping it rounded was to add rows of (1 sc per st) in between the rows of increases. Then do several rows (3 or 4 at least) of just (1 sc per st) at the end of increasing. These purses have 16 rows altogether (as an example).

If you can crochet a circle and want to try this out, simply follow the rule of thumb above and make the circle as big as you want...then make one more and stitch them together around the edge, leaving a zipper opening. Add a zipper of whichever length you want that would go good with the size of purse you made and voila! Done :)

Wednesday, February 16, 2011

Yesterday's Headband..this time a pattern! :)

I had some time to write down the pattern for the headband from yesterday's post (see below) and here it goes!

CROCHETED WIDE HEADBAND
size I hook and worsted weight yarn.

Ch 4.
Row 1: dc in 3rd ch from hook. dc in next ch and ch 2, turn.

Row 2: two dc in each st. ch 2, turn.

Row 3: dc in first st. two dc in each of next 2 st. dc last st. ch 2, turn.

Row 4: dc in each st. ch 2, turn.

Row 5: dc in each st. ch 2, turn.

Row 6: dc in each of first 2 st. two dc in each of next two st. dc in each of last 2 st. ch 2, turn.

Row 7: dc in each of first 3 st. two dc in each of next two st. dc in each of last 3 st. ch 2, turn.

Row 8: dc in each of first 4 st. two dc in each of next two st. dc in each of last 4 st. ch 2, turn.

Row 9: dc in each of first 5 st. two dc in each of next two st. dc in each of last 5 st. ch 2, turn.

Row 10: dc in each of first 6 st. two dc in each of next two st. dc in each of last 6 st. ch 2, turn.

Row 11: dc in each of first 7 st. two dc in each of next two st. dc in each of last 7 st. ch 2, turn.

Row 12-20: dc in each st. across, ch 2, turn

Row 21: dc in each of first 6 st. dc next 2 sts tog., dc next 2 sts tog., dc in each of last 6 st. ch 2, turn.

Row 22: dc in each of first 5 st. dc next 2 sts tog., dc next 2 sts tog., dc in each of last 5 st. ch 2, turn.

Row 23: dc in each of first 4 st. dc next 2 sts tog., dc next 2 sts tog., dc in each of last 4 st. ch 2, turn.

Row 24: dc in each of first 3 st. dc next 2 sts tog., dc next 2 sts tog., dc in each of last 3 st. ch 2, turn.

Row 25: dc in each of first 2 st. dc next 2 sts tog., dc next 2 sts tog., dc in each of last 2 st. ch 2, turn.

Row 26: dc in each st. across. ch 2, turn.

Row 27: dc in each st. across. ch 2, turn.

Row 28: dc in first st. dc next 2 sts tog., dc next 2 sts tog., dc in last st. ch 2, turn.

Row 29: dc next 2 sts tog. dc next 2 sts tog.

Finish off, weave in ends. Sew on button of your choice to one end and make sure it fits through a st on the other side. :)

At this point you can add any other embellishment or applique of your choice!! :) I do ask that you please not copy/reproduce this pattern for sale and that you give credit if you post photos of a final item. But make as many as you like!! :)

Tuesday, February 15, 2011

Tri-Spiral Applique on Wide Headband (crochet)


Yesterday I was trying to find a headband pattern that I could crochet and the one I found looks similar to this one. I tried it out following the pattern to a T and the end result was so small I don't think it could even fit on a doll head! So I made a 2nd one using a bigger hook than it called for...and it was an improvement, but still too small. So my 3rd and final attempt was this one. I still used the same hook as try #2 (which was an "I" hook) but I changed the pattern to be longer and not as wide...and hurrah it worked! :) As an added embellishment, I crocheted a tri-colored spiral and whipstitched it to the side. :)


I think because had to make so many changes and basically start all over from scratch from the original pattern, I will just rewrite it into my own and when I get some time I'll post it up here for anyone who would like to try it! :)

Monday, February 14, 2011

Gnomes and Skirts


"Would number 4 please step forward from the lineup?"

I'm pretty sure I've posted the 2 gnomes on the left and maybe Bluebeard, but the mustache gnome is new as of yesterday. :) He got a funky multi-colored hat and some bright red lips, too! So far I think the redhead is still my favorite. :)


A friend of mine had seen the skirts I made last summer and asked if I'd be able to make some for her little girls. Of course I was happy to oblige- and here are the final results. One of them really likes purple and the other loves pink! The best part about these skirts is that the only materials it takes to make one are: 2 bandanas and 1 fat quarter (like for quilt making). Those along with a little elastic for the waist makes out to be just about $3.00 per skirt. Not bad!! It's an inexpensive way to keep the girls looking cute and comfy all spring and summer long. :)

Though I have made this skirt with a few different changes, the original "how to" that I used is here in case you'd like to try making one. :)

Saturday, February 12, 2011

Amigurumi Baby Penguin (crochet)


Look at who just moved into my freezer!! He even caught a little fish :) I just finished putting on the final touches a little bit ago and wanted to share while I've got a couple minutes to sit here. The pattern for the penguin comes from "Super Cute: 25 Amigurumi Animals" by Annie Obaachan. The fish wasn't a part of it, but I thought he needed a little something extra to hold on to. :)

And now that I have new batteries for my camera (the "better" camera, that is) I can get a bunch of photos done this next few days and have some new listings on Etsy. This guy will be one of them :) Can't live in my freezer forever, ya know!

Friday, February 11, 2011

Amigurumi Piggy (crochet)

Another pattern adapted from the "Tiny Yarn Animals" book. You might notice that the body and head are similar to the koala from yesterday...but the legs and arms are a bit skinnier/longer. And of course Mr.Piggy has a snout, different ears and a TAIL!!

For some reason again the pattern didn't have a tail, so I put one on. I mean, what kind of pig doesn't have a curly little tail, right??! And I've had the best authority to let me know the koala doesn't need one ;) Thank you G.I.A.S.!! :)

Thursday, February 10, 2011

Amigurumi Koala (crochet)


Hello! Just finished making this little koala and it is adorable. :) And it only took a couple of hours to make. Sometimes when I see patterns I want to try or have an idea in my head, I put it off until later because I think it might take a long time to finish. I'm one of those people who likes to get a project from start to finish in one sitting (mayyyybe two). Anyway I think I might have to still add a tail to him since he doesn't have one at the moment and I think they're supposed to. Otherwise he is about done :D What do you think?

Wednesday, February 9, 2011

Cross-Stitch Cupcake


So! As we can all see...I did this wrong. haha It is my first attempt at doing cross-stitch since I was a lot younger. It is one of those "EZ" kits that come with everything you need...including a round frame to put the finished thing into. Um, I tried that but it didn't work since I had it off to the side too much. Below is what I did instead:


All finished and put into a square frame! :D See..that is how you fix mistakes!!! And next time, I know to start in the center of the entire piece of fabric, not just the center of the side! :)

Monday, February 7, 2011

Tiny Cupcake Pincushion and (crocheted) Poptart!


I've decided to add another hobby to my list of things I like to do and craft. (As if I need it or have the time lol) Cross-stitch! I used to do it when I was maybe 12 years old and let's just say it's been a while! Anyway, before I start re-learning how to cross-stitch, I thought I'd make a little pincushion to be able to use. This little tiny "cupcake" one is what I made.

The "cake" portion is from a bottle cap off of a liter bottle, and the "frosting" portion is 3-inch circle of pink fleece (sewn around the edge loosely and pulled tight to make it into shape) stuffed with polyester fiber fill. After I stuffed it, I used a hot glue gun to fill the bottom part of the cap and then just fit the frosting part into it and made sure it stuck really good. And there you have it! A miniature cupcake pincushion. :)


I made this a few days ago and thought I'd already posted it, but somehow missed it in the photo folders! So here it is..a giant poptart crocheted with 100% cotton yarn. I think if I ever made one again I would make it smaller and more life-size. This is about 1 1/2 times the size of a real one.

Sunday, February 6, 2011

Pizza Slice (crochet)


Mmmm pizza :D This is 3 layers thick because there is one for the crust, one for sauce and one for cheese. Plus the toppings. I think it would be fun to have a whole pizza's worth of these and a box to put them in. Someday if I have a lot more time! haha Pattern is from the "Tasty Crochet" book. :)

Today I was able to go out and buy more colors of the cotton yarn I like to use for the food/amigurumi stuff (Sugar & Cream brand). I have noticed that there don't seem to be a lot of solid "plain" colors in that brand...at least in the stores around here. They have a lot more of the mixed varigated balls than they do just of the all one color balls. But you can't beat the price or the crochet result of the 100% cotton so I will have to just hunt around to see if I can find more. :)

Friday, February 4, 2011

Gnomes and Fingerless Mitts (crochet)


I've added a red-headed gnome to the bunch :) I don't know why, but when I went to add the beard and eyebrows, it whispered "use orange for me" so I did. :) I'd love more ideas on color combos and detailing if you want to leave a comment below with suggestions for me to try. :) The possibilities are endless, I know, but sometimes I get crafters' block!


This is a pair of fingerless mitts I made last night over a few reruns of Golden Girls and Cheers. :) It didn't use much yarn at all...if I had to guess, I would say maybe 1/4 skein of each of 2 colors. The varigated green/yellow/blue yarn is a skein I've had for years and it finally swam its way to the top of my stash to be used. It still isn't gone. I might just added the rest of it to the scrappy blanket where all my ends wind up. :D

The pattern for the mitts is actually from the Twinkie Chan book and is the pattern for her strawberry mitts, but using black and blue/green instead for a totally different look.

Wednesday, February 2, 2011

Play food (crochet)


More crocheted play food! This time there is an apple, a carrot, and an ice-cream sandwich. Let me just say...about that i.c.sandwich...I only wish the real ones were that big! (Probably a good thing they're not) hahaha. I even left a row off of the white portion because it seemed abnormally thick. I also added the white "dots" on the top part which wasn't part of the pattern, but I thought made it look more realistic like when the ice-cream is squishing out the holes on top!

All three patterns were from the "Tasty Crochet" book. I've seen it on Ebay and Amazon for pretty decent prices, so check there if you're after a book of fun food patterns. :)

Tuesday, February 1, 2011

Gnome, Pie and Berry! (crochet)


I got a new book called "Tasty Crochet" (thanks, Mom!!) in the mail and am LOVING all the patterns. So far I am just picking and choosing randomly based on whether or not I have the yarn colors to make whatever it is. Here above is the strawberry. Matching nailpolish was a coincidence!

(Speaking of which...the color is Emerald and the brand is the new Revlon Top Speed. If you want to have nailpolish that dries FAST so you can get back to crafting and/or kids, get this!)


And here we have a slice of pie...it was supposed to be pumpkin, but I didn't have what I deemed the correct "pumpkiny" color so I went with cherry instead. :D By the way, all the patterns so far seem to make pretend foods that are life-sized as opposed to miniatures. I'm fairly certain though, that you could always use a smaller hook and/or yarn to make the foods a little smaller if you wanted.


And another little gnome!! I think making these is one of my favorite ways to use up last bits of yarn that I don't want to just throw away. It is entirely made up...just like the one I posted a few days ago. This time I gave him pink cheeks and eyebrows and I think it looks better. He is a OOAK. :)