Tuesday, November 30, 2010
Ruffled Fingerless Gloves (crochet)
Just added to Etsy: ruffled fingerless gloves! (with flower) ;)
After reading a lot of different patterns from books and online, and trying one or two...I decided to mix/mash several of them in my head and make these gloves. I love the result and glad I decided to try it! This is basically without a pattern, just some ideas thrown together. You can visit my Etsy shop to see more photos!
Sesame Street Charms
Good afternoon! Sorry for the somewhat blurry photo but it works :P Left to right we have Big Bird, Cookie Monster, Ernie and Elmo. These are made with polymer clay and have wire loops to make them into charms. :) I had made a few of these a while back to give to nieces/nephews/kids and saved a set to put on Etsy for anyone who is interested. :) Time-permitting, this set will go up later today!
Monday, November 29, 2010
Coffee Mug Cozy and Hoop Earrings (crochet)
I hope everyone had a great holiday weekend and start to the new week! I spent some time making these two things while I had the time off at home. Top is a coffee mug cozy made using a star stitch, which I'm pretty sure I messed up...but at least it is *evenly* messed up LOL. I didn't use a pattern for it, just picked my yarn (100% cotton) and kinda held it around the cup every so often until it was as big as I wanted it, then added a couple of chain "straps" to hold it on. I like how it turned out.
The second picture is a pair of hoop earrings also crocheted onto using #10 crochet thread and a #7 steel hook. It's the first time I tried something so small and it was a little difficult at first since I'm not used to the teeny sizes of it all, but with practice I think it'll get easier. In the end I decided to give this pair to my sister as a hostess gift for having Thanksgiving at her house and she seemed happy with them :) So that is what counts!
Tuesday, November 23, 2010
Snowman Ornament (polymer clay)
It is a blustery day outside!! I'm sure anyone living where it's snowing and freezing right now know all about it! We've gotten a few inches of snow and temperatures below 10 degrees over the last couple of days and so I thought this little guy was appropriate. :) He's a sparkly snowman (and a heart on his behind) :P and going up on my Etsy today for anyone interested in checking him out. Perfect to hang on a tree of any size or even to use as a charm for a necklace or zipper. Stay warm everybody :D
Monday, November 22, 2010
Little Black Shrug (crochet)
Hmm...well I don't think the photo does this project any justice, and not having it on a model doesn't help either (but you can google "crochet shrug" and get an idea of how they look on someone). It is a great thing to have if you want to wear short sleeves still or even tank tops or sun dresses but want the chill off of your shoulders and arms. I made this one for my little niece and it'll be part of her wardrobe for taking pictures with Santa this weekend. :)
If you want to make one for yourself or someone you know, here's the low-down:
Measure across how long you want the finished width to be (so in this case, from wrist to wrist because it's long sleeved). Mine is about 27 inches, and using a G hook it took about 100 chains to make it that width. You can use any stitch you want (mine is a simple block stitch) and simply start crocheting back and forth across the width until you have reached how *tall* you want it to be from the neck (top) to the bottom part of the shoulder blades (bottom). Finish off and weave in the tails. The final step is to sew in the arms. You should already have a rectangle shaped piece. From the photo above you can see where the arms are sewn (top and bottom of the ends of the rectangle) to create sleeves. Make sure to give "wiggle room" to get arms in once it is finished...if you have any questions, leave a comment and I'll try my best to answer! :)
Hat and Cowl Set (crochet)
I finished this crocheted hat and cowl set (made with a color called "Driftwood" in chunky weight yarn) and love it! Altogether it only took about 2 1/2 hours, maybe a little less, to create both pieces. The cowl doubled over around the neck and is extra warm and soft. These particular ones are going to be gifts, but I may have to make another set for me since I am lacking in the neckwear department! :)
Friday, November 19, 2010
"amigurumi" Owl (crochet)
Yay he's finished!!! This is the first amigurumi animal I've tried to make and considering that, I think it turned out pretty well. Though it does look more like a cross between an owl and a penguin if you ask me. Still cute! :) The pattern is from the book "Amigurumi World: Seriously Cute Crochet" by Ana Paula Rimoli. I checked my copy out at the local library, but I like the instructions and projects well enough that I might get my own someday. :)
Tuesday, November 16, 2010
Clutch (crochet)
I love this little purse (clutch). It doesn't have any handles or straps but is very thick and sturdy for almost anything you want to put in it. The zipper is hand-sewn into it and let me tell you how much fun that was (not).
The pattern is from the book "One Skein" by Leigh Radford and if you're ever looking for quick projects to make using one skein (or less) of yarn, I recommend checking it out!
Monday, November 15, 2010
Crochet goodies!
From top to bottom we have: a panda coffee-cozy, slippers and a belt! I've been busy the last couple of days whipping these up. The belt is a tunison-stitch..very basic and then 2 d-rings sewn on one end. The panda cozy is actually something I made up from a few ideas I've seen and this is my version. The slippers are the same as the last ones posted, but made with one hook size larger (no other changes to pattern or yarn type).
Friday, November 12, 2010
Slippers (crochet)
These are my first successful attempt at making slippers from crochet. They are a tiny bit smaller than I expected but do stretch to fit. I used Sugar & Cream 100% cotton yarn (one 120 yard ball of the red color and just a few yards of the green) so it's nice to know they can be made with one skein. The cotton makes them pretty durable as well. :) Time to make more!
Thursday, November 11, 2010
Stocking Cap and Beanie w/ Flower (crochet)
Finished these both up yesterday and decided that I will have to make another of the stocking caps with a different stitch. The one I used was mostly all "single crochet" and it came out very dense and warm but not very stretchy. That's what I get for following a pattern sometimes! lol With a few adjustments I think I could get one a little stretchier and even adults can wear it ;) Bottom hat is a simple beanie pattern with a crocheted flower sewn on. :) Both patterns are from the book "Hooked Hats" by Margaret Hubert.
Wednesday, November 10, 2010
Freezer Paper Shirts and Bag
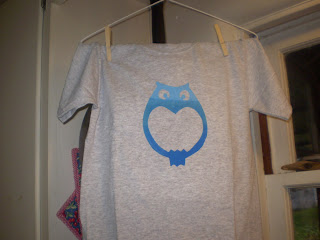
Good morning!! I know everyone on the planet has probably seen/tried these before, but it was a first time for me yesterday and I'm loving how they turned out! Top shirt is an owl... I used 3 different shades of blue to sort of "fade" the colors. Middle is a drawstring backpack from the $1 bin at Michaels Craft Store and has a cupcake stenciled on. And the bottom shirt has a gnome and his mushroom home! (The shirts were $2 at Michaels on sale this week). I bought a roll of freezer paper at Walmart (but you can get it anywhere you buy foil, plastic wrap, ziplock bags, etc..) for about $5.50 and you get 150 feet.
Basic instructions for making these: find your silhouette/design and trace it onto a piece of the freezer paper. Make sure to give yourself a border of a couple inches so you have room to work with the paint. Next, cut out the design carefully so you have the outline to place onto your shirt (or whatever fabric). ** Placing the PLASTIC side of the freezer paper DOWN, iron over it with a hot iron for a few seconds (that's all it takes) until all the edges are sealed. It is a good idea to place a piece of paper (regular paper) between the layers of fabric so when you paint, it doesn't go through to the back. Next you take your acrylic paint and paint brush or foam brush and go to town on the coloring! Hang it up to dry and afterward, carefully peel off the freezer paper. :) All done!
**The owl one I did had more details to cut out (the eyes and stomach portions) so you have to place those and iron them down separately from the rest of the outline part.
If you wanted, once it is dry, you could put a piece of paper over the top of the dry painted part and run the iron over it real quick again to "set it" more, but I don't think it is completely necessary. When washing, turn the item inside out if possible. :) Have fun trying this out!! It can be quite addictive once you do one and think of possibilities.... :)
Tuesday, November 9, 2010
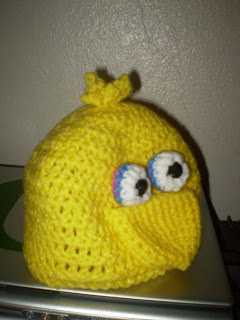
Sesame Street Hats (crochet)
I love these hats!! It's one of those projects that I've had on my back-burner for a while now and finally decided it was time to try it out. I used a different "beanie hat" pattern than the one in the tutorial only because it was one I have used before and knew how to do pretty quick. But for all the face-parts, I used this site. I need to find a better way to make the pupils of the eyes, I think...but for a first attempt I am happy! :)
Sunday, November 7, 2010
Hackey Sack, Cupcake and Coffee Cozy (crochet)
From top to bottom... a stuffed cupcake, hackey sack and coffee cozy. All crocheted using 100% cotton yarn, which is my current favorite to work with. My SIL had made me a cupcake not too long ago that I LOVED so I wanted to see if I could try my hand at one from a pattern I found online. I don't care for the face too much, but the rest of it turned out good. :) Next time I'm thinking of trying beads or something along those lines for the face.
The hackey sack is a great way to use up those last bits of yarn because it takes very little to make one and you can change the colors around as much as you want to. Nice stocking stuffers, I say! I'll be making a bunch more for Christmas time as I get toward the end of skeins I am using on other projects lately. :)
Monday, November 1, 2010
3 More Coffee Cozies (crochet)
I debate over whether or not to post these things lately since some may end up as gifts, but at least no one will know which one would be theirs! I'm also trying to make up some for Etsy because let's face it... we can all use some extra spending money around the holidays.
All 3 of these are crocheted. The top and bottom 2 are the same pattern but different yarns. I like the multi-colored look of the top one. The middle has a different border along the top. That was officially the first crocheted thing I ever made using a pattern but changing to make it a little different. Now that I'm figuring out patterns more and more, I hope to be able to learn how to make up something from my head without a pattern someday. That is the goal! :)
Subscribe to:
Posts (Atom)